If you missed the first movie, click here to go back.
This is the second step, after you have made the first "circle", or row. Continue to wrap the bundle AND THE TAIL of the binder, wrapping "over the top", or away from yourself. I usually wrap 2 times for the first turn, and then, remembering to bring the binder UNDER the bundle, insert the needle through the "eye" in the center. You may need to gently bend the needles to conform to the roundness of the button you have started. This is your first turn. Continue wrapping 3-4 times and putting the needle through the center until you have gone around the center, or "eye". You have just made the second row of your basket. After that point, you will continue to wrap, but put your needle in between the first row and the second row. Then go on to movie 3, of approximately the same size. -------------Give the movie a couple of minutes to load...it may load very slowly, and show a few photos and just a couple of words at a time. After it loads completely, it will "loop", and you will hear and see it smoothly. If the movie does not load and play, try clicking the photo above left, to open the movie in a separate window. ---------------------- Demonstration and webdesign by Pamela Zimmerman Copyright, 2003, all rights reserved
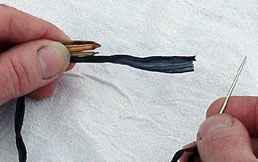
This is the second step, after you have made the first "circle", or row.
Continue to wrap the bundle AND THE TAIL of the binder, wrapping "over the top", or away from yourself. I usually wrap 2 times for the first turn, and then, remembering to bring the binder UNDER the bundle, insert the needle through the "eye" in the center. You may need to gently bend the needles to conform to the roundness of the button you have started. This is your first turn.
Continue wrapping 3-4 times and putting the needle through the center until you have gone around the center, or "eye". You have just made the second row of your basket.
After that point, you will continue to wrap, but put your needle in between the first row and the second row.
Then go on to movie 3, of approximately the same size.
-------------Give the movie a couple of minutes to load...it may load very slowly, and show a few photos and just a couple of words at a time. After it loads completely, it will "loop", and you will hear and see it smoothly. If the movie does not load and play, try clicking the photo above left, to open the movie in a separate window. ----------------------
Demonstration and webdesign by Pamela Zimmerman Copyright, 2003, all rights reserved